

Understanding malware is essential to defending an organization against attacks. Analyzing suspicious applications helps us determine if an alert is a false positive, and the information discovered can be used to help remediate an incident or strengthen a system's defenses against further attacks.
Although many automated tools can be used to analyze malware, for example Hybrid Analysis, or VirusTotal, they don’t always provide the level of detail we need to understand and add context to the incident. These tools rely on preset rules to detect malware attributes and may struggle with evasion techniques. Furthermore, some people are just looking to explore malware to understand how they work and this is not something these tools can provide.
Before analyzing malware, it is important to set up a secure environment that safeguards both the analyst and the systems involved. The requirements of this environment include network and device isolation to prevent spread; disposable systems to remove infected environments and create new, clean ones; and finally, security tools provided to analyze the malicious files. When creating this environment, I took inspiration from the design of adanalvarez on GitHub which was created from TCM Security’s Practical Malware Analysis & Triage course.
Environment overview
Here you can see the tools used for this project. Most of these tools are easily accessible for all users to use.
Terraform Cloud: Manage lab creation/removal
GitHub: Hosting the Terraform files
AWS: Hosting the labs and environment
Slack: Control the lab and user notification
CrowdStrike (Optional): Deploy labs when new detections occur
Out of these tools, Terraform Cloud is the most essential and is central to this project. CrowdStrike is used as an example of how this automation can be used to manage labs independently, however, this can be replaced with many other tools, including other EDRs, sensors, or honeypots.
Lab Environment

This AWS lab environment consists of multiple subnets in an isolated VPC. Each subnet is a separate malware lab. These malware labs have 2 EC2 instances, Flare-VM by Mandiant and INetSim. Flare-VM is a collection of software installation scripts that provides many malware analysis tools for Windows. INetSim’s network emulation assists in providing fake network responses to potential malware, helping disguise the isolated nature of the environment. Malware can use the lack of network connectivity to detect if it’s in a sandbox environment, allowing it to hide its malicious components.
Both of these VMs have their own security groups. As the malware will be loaded onto the Flare-VM instance, this has its outbound connections restricted to the S3 interface endpoint to load the malicious files from the S3 bucket, and has complete connectivity to the iNetSim instance. When loading this instance, two commands are run. The first downloads the file from the S3 bucket and the second sets the DNS server and default gateway to be the iNetSim instance. The iNetSim instance allows all connections from the Flare VM instances. It also has internet access to download and initialize the network simulator.
Finally, in this environment, there is an S3 interface endpoint that acts as a bridge between the Flare-VM instances and the S3 bucket. This interface is locked to the VPC and only allows access to the specific bucket.
Introducing Tines
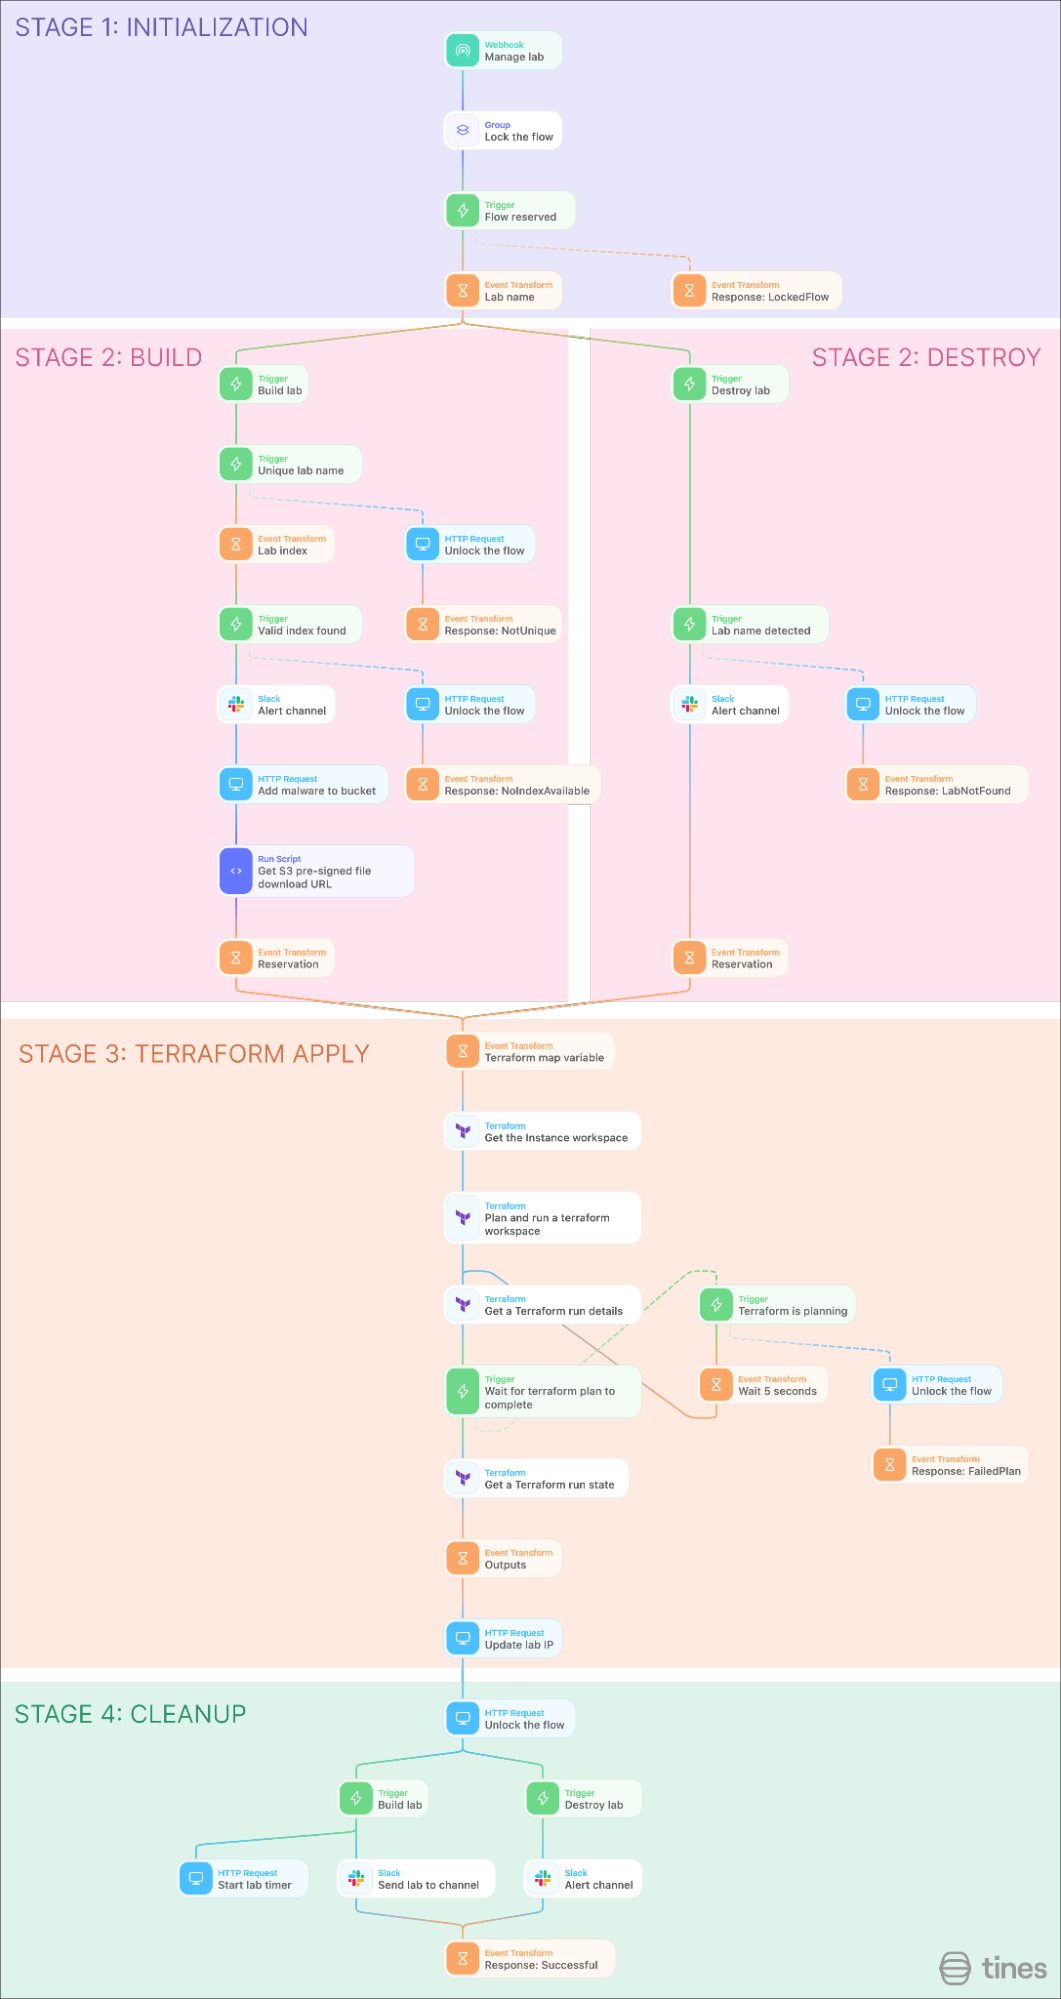
Since we have Terraform managing the lab infrastructure, Tines can be used to orchestrate between Terraform and various other tools that might be used to start one of these labs. To start this orchestration, we need to use automation to build and destroy labs in terraform.
This story is broken into 4 sections:
Initialization
Checks if another run is ongoing
Build/Destroy
Checks if requested action is possible and builds the request
Terraform Apply
Sends the request variables to Terraform and waits for the run to complete
Cleanup
Saves the Terraform output and starts the lab timer.
Stage 3: Terraform Apply
Looking at this automation, we’re going to skip the first two stages and go to stage 3. In this section of the story, we are going to manage Terraform. For this, a cloud Terraform instance was created with the Terraform project used. Using Tines, we can create a Terraform variable input which looks something like:
lab_1 = {
  index = "1",
  url = "https://malware-analysis-s3-bucket.s3.amazonaws.com/lab_file.zip?AWSAccessKeyId=XXXXXXXXXXXXXXXXXXXXX&Signature=XXXXXXXXXXXXXXXXXXXXXXXXXXXXXX&Expires=XXXXXXXXXX"
},
lab_2 = {
  index = "2",
  url = "https://malware-analysis-s3-bucket.s3.amazonaws.com/lab_2_file.zip?AWSAccessKeyId=XXXXXXXXXXXXXXXXXXXXX&Signature=XXXXXXXXXXXXXXXXXXXXXXXXXXXXXX&Expires=XXXXXXXXXX"
}
Once this variable is passed to Terraform, Tines checks the run status and waits until the run is finished, or in some cases, until it fails. Once this is complete, the Terraform output is uploaded to a Tines resource.
Stage 2: Build/Destroy
Going backwards into stage 2, this stage is responsible for creating the variable that is passed to Terraform. As we said in stage 3, the Terraform run outputs are saved into a resource, so by retrieving this resource, Tines knows the current state of the labs.
When destroying a lab, Tines first checks if the lab to be destroyed is present in the resource. If it is, this lab is removed and the remaining labs are passed to stage 3. If the lab which is to be deleted is removed from the variables, Terraform will destroy this lab.
When building a lab, Tines first checks if the lab name is unique and if there is an index available to be used. If both these checks pass, the malicious file is uploaded to the AWS S3 bucket and a pre-signed URL is created. However, it is not possible to create a pre-signed URL using AWS’s REST API. Because of this, the Run Python Script action must be used. Using the Boto3 Python library, the URL is generated and can be added to the labs variable, which is passed to stage 3.
Stage 1 and 4: Initialization & Cleanup
With the way stages 2 and 3 are laid out, this story can run into issues if multiple runs are started simultaneously. To solve this problem, I used the story Lock a portion of a story for updates from the story library. By locking the story flow before stage 2 and after stage 3, I can ensure that multiple runs of the workflow don’t interfere with each other. One change I made from this technique is removing the throttled loop if the flow is locked. Instead, I returned a failed run. This allows a parent story triggering a Terraform run to choose whether to try again after a delay, or to abandon the run and provide a failure message. Locking the flow also required an unlock action to be added where a failed check or run was detected.
Connecting to Terraform
From this central core story, other tools could be used to start or stop labs. In this case, 3 were added:
Lab timer - Automatically destroy labs after a set amount of time
Slack - Allows users to create, destroy, and view labs using Slack commands
CrowdStrike - Build malware analysis labs when suspicious files are detected.
Below you can see how these stories connect.
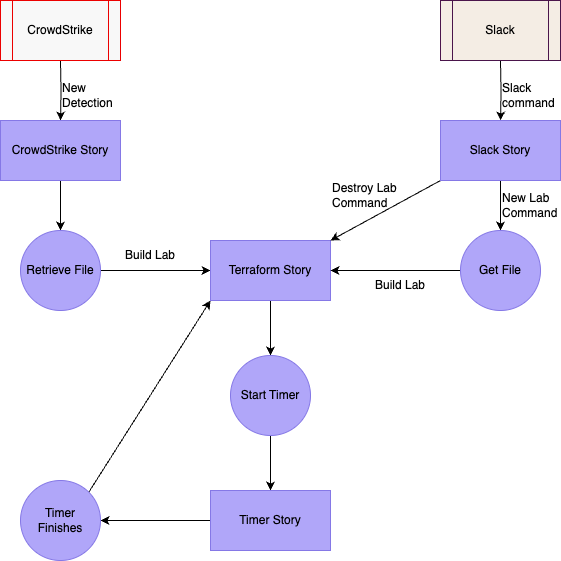
Lab Timer
The goal of this story is to automatically destroy labs that are older than an hour. This is useful as there are only so many usable indexes provided by the Terraform lab, and it helps if users forget to destroy them after use. This works by receiving an HTTP request with a lab name once Terraform has successfully built it. This feeds into a 55-minute delay where a warning message is sent in Slack. After another 5 minutes, this story sends a destroy command back to the Terraform story with the lab name.
However, alongside the Slack warning message, 2 buttons are added. The first button allows a user to terminate this lab instantly and the second one extends the lab’s life by another hour.
Slackbot
This is the main way of controlling the lab environment, however, this bot is also used for general notifications. Slack is used in the other stories and the Slack interactivity integrates with the Lab Timer story, however, the use of Slack commands is centered on this story. This story also has a Tines page allowing users to download RDP files to lab environments. If no lab ID is provided to this page, you can search for labs with the page.
/create-lab
This command is used when a user has a file they’d like to investigate. It can take an argument of the lab name, however this isn’t required. After running the command, a link to a Tines Page is provided. This page lets you set the lab name, if it wasn’t set before, and allows the user to upload a file. After running this command, the user is directly notified when their lab is complete, and a download page containing a remote desktop file to connect to the lab is provided.
/delete-lab
This command takes an argument of either a lab name or index. When this command is run, the lab is searched for and deleted.
/get-lab
This command is used to get access to a lab. A lab name or index can be provided as an argument. If no argument is provided, a list of labs is shown and can be selected. Once a lab is selected, or provided in an argument, the lab is retrieved and a RDP file download page is provided.
CrowdStrike Detections
Although we can manually deploy labs with Slack, a key benefit of this automation is that labs can be automatically deployed from other tools. EDRs are a prime example of where you might want this happening. For example, if your EDR tool, like CrowdStrike, detects malicious files, Tines can be used to retrieve the file and deploy a new lab from this. This can help speed up investigation times as analysts are no longer waiting for lab creation to complete and can go straight into the analysis. Furthermore, malware honeypots, user file submissions, or malware sharing tools like MalwareBazaar can be implemented using this method.
Analyzing Malware
With the first stage of malware analysis complete, environment creation, you can now start your safe analysis. When testing out your environment, there are various sources where you can find files to analyze. These include MalwareBazaar or The Zoo. These are locations where people share malware they discover for researchers to investigate. They also provide files for users to practice analysis.
All the files used in this blog can be found in the workflow template below, which is one of over 700 in our library.


Create and manage malware labs using Terraform Cloud
Utilize Terraform Cloud to quickly create and manage safe malware analysis labs. Malware labs are deployed in secure AWS networks with the tools Flare VM and INetSim. Suspicious files are safely transferred to the environment for reverse engineering.