
In Part 1 and Part 2 of our Chatbots for Security and IT Teams blog series, we examined how to build Chatbots for Microsoft Teams. While Microsoft Teams has now overtaken Slack in terms of popularity, Slack retains the hearts and minds of many, and healthy competition will no doubt result in better features for both. This blog will examine how to create a Chatbot in Slack to improve communication and collaboration within your team.
This process of collaborating within a chat tool is commonly called “chatops” – “a collaboration model that connects people, tools, process, and automation into a transparent workflow” according to Atlassian.
In order for ChatOps to be successful, it requires both the ability to kick-off automated actions from within the chat application, and for an automation solution to send alerts and data to the chat program both proactively and reactively.
In this blog, we will examine how to send basic notifications in Slack to a single channel, then we’ll examine how to interact with our Chatbot from within Slack, and lastly, we’ll learn how to send proactive notifications to individual Slack users.
As mentioned in Part 1, the idea of Chatbots for security and IT teams is not new – security teams in Slack, Netflix and Dropbox, among others, have created open-source Slack Chatbots for alerting purposes and for indicator enrichment. Creating your own Chatbot which fits your own internal processes allows you to be more flexible in your tool and process choice, and keeps your information private, however you should check out their blogs for useful ideas!
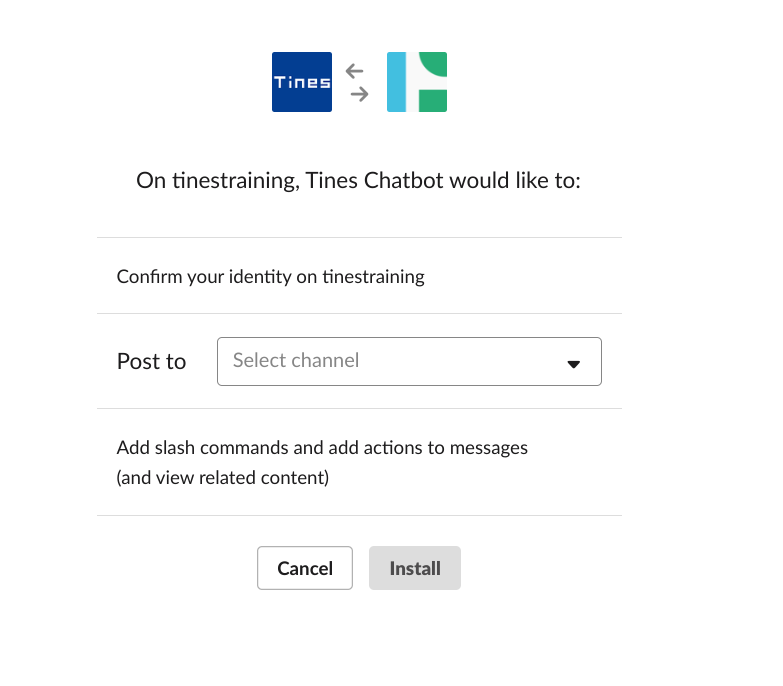
The first step to setting up your Chatbot in Slack is to create an OAuth application here – https://api.slack.com/apps. You’ll need to be an admin on your workspace, or be working with an admin, in order to do this. When you follow the link, you should be presented with a page like this.
Creating a Chatbot within Slack
Create an application called “Tines Chatbot” (or whatever name you choose). When you create your Slack App you have to choose your workspace. If this is your first time setting up an application, it may make sense to test in a demo or development workspace.

On the next page you’ll be presented with several options on what features and functions you’d like for your application:
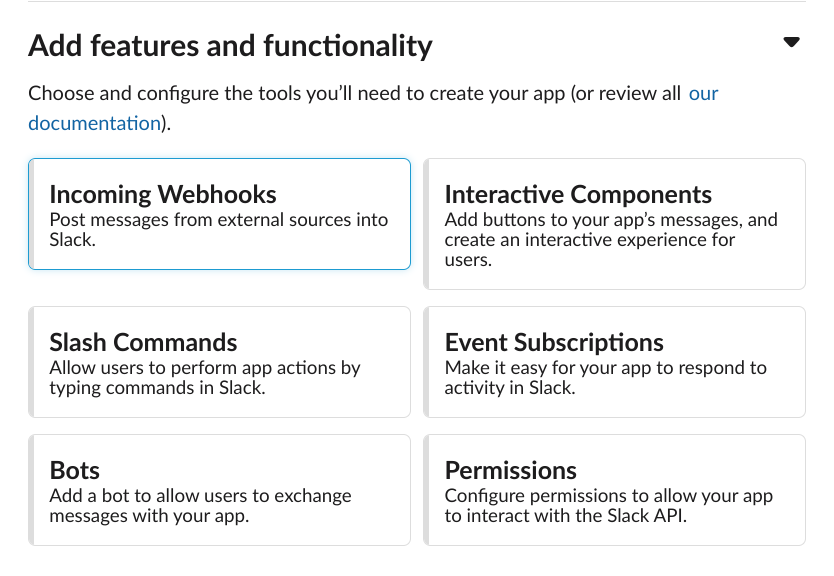
Incoming Webhooks – post messages from Tines directly to a channel (e.g. the Incident Response channel). Use this to send Prompt messages to a specific channel where the channel details will not change e.g.
Post information details of new high priority incidents into an InfoSec channel or IT channel
Post alerts for incidents close to SLA limits
Inform teams of new servers deployed or new vulnerabilities found
Interactive Components – creates shortcuts to specific actions with right-click actions on messages
Slash Commands – allow a user to interact with Tines through specific, user-defined commands e.g.
/searchdomain – search for traffic to a domain in logs
/lookupdomain – lookup a domain’s reputation
/lookupuser – find user profile information in active director
/lockaccount – lock a user’s account
/quarantinedevice – quarantine a device proactively
/escalateticket – escalate a ticket
/blockdomain – block a domain on the firewall
Bots – allow two-way text communication with a user (i.e. not just clicking links to prompts)
To quickly demonstrate how to get an alert from Tines into Slack, let’s select “Incoming Webhooks”
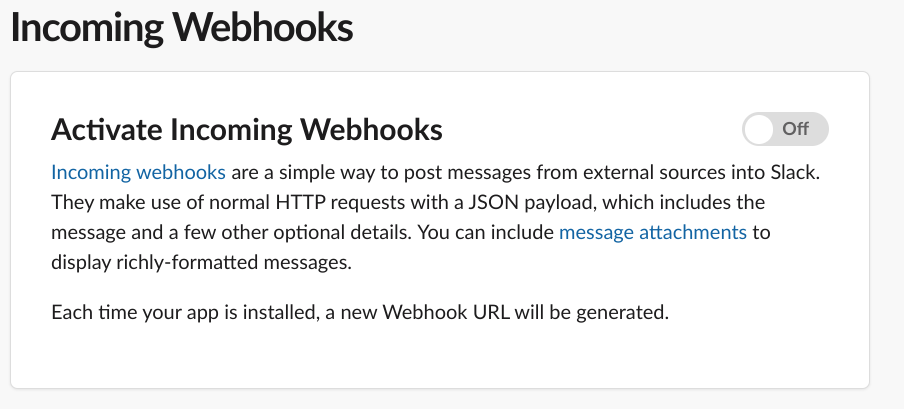
Incoming Webhooks
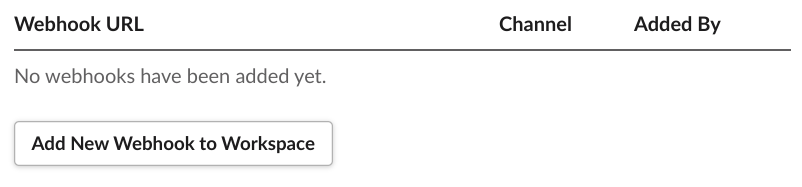
The most simple interaction with Slack are notifications sent to a specific channel via a Slack webhook. Let’s click on “Incoming Webhooks” on the screen above. If you’ve moved past this screen, click “incoming webhooks” in the features menu. Then click “On” in the top right-hand corner.
Now, click “Add New Webhook to Workspace” at the bottom of the page
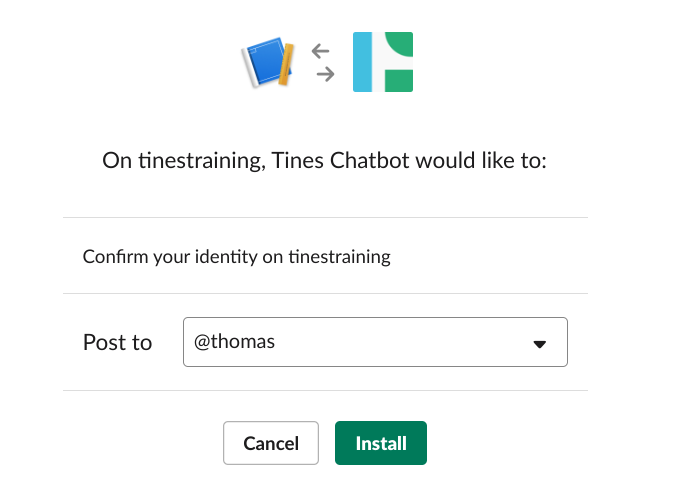
Now, choose a channel to post these notifications in. I’m going to select my personal channel, @thomas. Now click “Install”
Slack will return a webhook URL. Let’s send this webhook URL a message from within Tines.
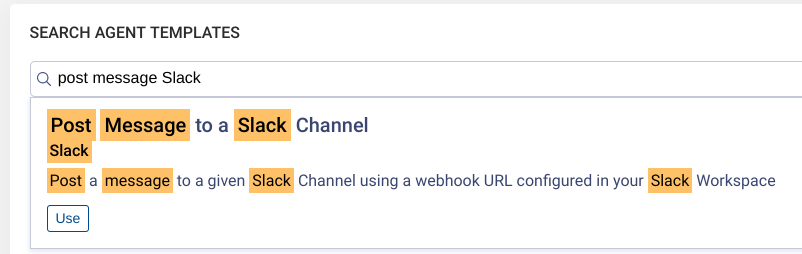
In your Tines tenant create a new Story called “Slack Chatbot”. In that Story create a new Action using the template “Post Message to a Slack Channel.”
Give it the name “Post Message to Webhook”
Enter the Webhook URL you just created in the URL parameter
Click Save
Now click “Run Action”
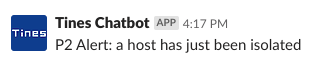
You should receive an alert within your chosen Slack channel:

Congratulations! You’ve just sent your first message to Slack!
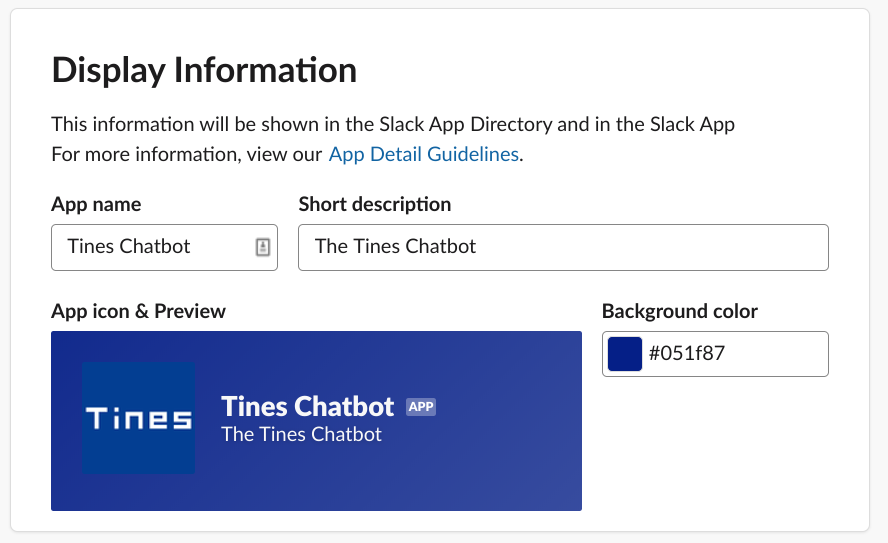
Next, let’s make the App look slightly more professional – choose a logo for your Chatbot in the “Basic Information” settings.
Click “Save Changes” at the bottom of the page. The alert should now look a little much better:
You can use this alert to send messages to an IT or Incident Channel every time a new alert is created, for example. If you have alerts specific to an individual team you can simply install a webhook for their team channel to alert them for specific actions. You can read more about formatting Slack messages here.
Slash Commands
There are obviously significant limitations to a simple webhook – the most obvious is there is no way to communicate back to your Tines Chatbot. Fortunately, this is relatively easy to do in Slack using “Slash Commands“. You can send “Slash Commands” to proactively kick off automation stories within Tines.
In this example, we’ll use the command /analyzedomain to kick-off the analysis of a domain within Tines from within any Slack Channel in your workspace.
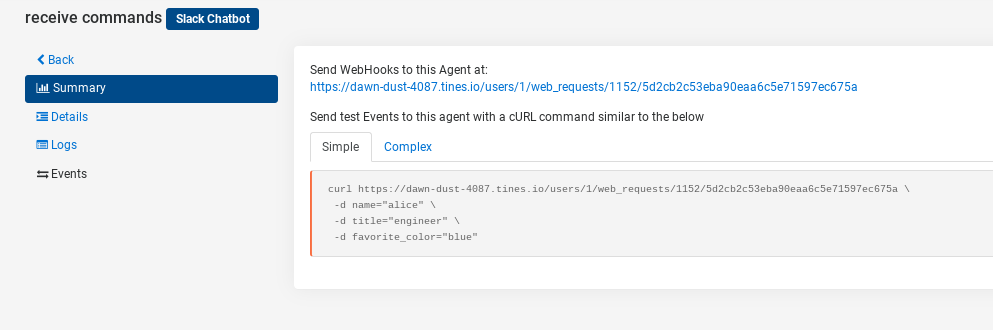
First, let’s set up a new webhook within our Tines Story. Let’s call it “Receive Commands.”
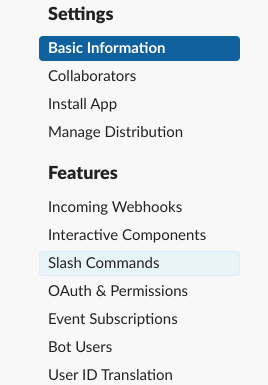
Then, in Slack, let’s go to the Slash Commands section of your application. You can choose this section in the “Features” menu on the left-hand side of your page
Then click “Create New Command.”

Enter the command “analyzedomain”, and your webhook URL in the “Request URL” section. Add a short description, and a usage hint. You can leave everything else as it is.
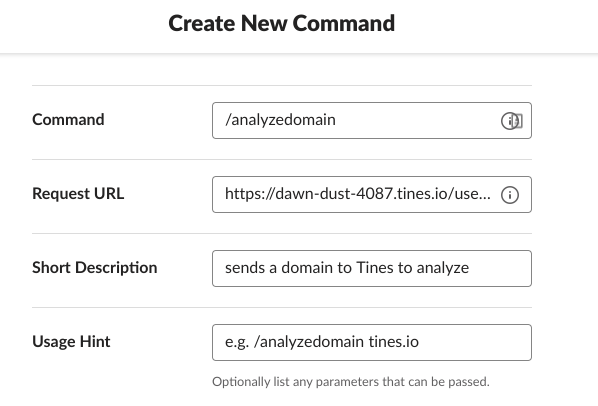
Now click “Save.”
Note: When you change specific permissions in slack you should get a notification saying the scopes have changed – you’ll need to “reinstall the app.”
Now, let’s go to a test channel within our Workspace – you can choose whichever one you want.
Start typing “/an…” and the Slash Command should pop up.
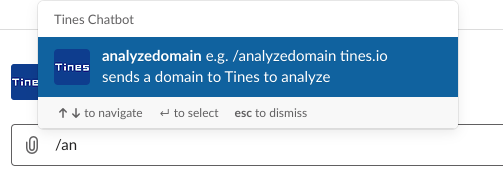
Type “/analyzedomain tines.io”. You should get the response:

Let’s look at the data received in Tines – we can see that we have the channel ID, channel name, the name of the user who sent the request, and the command, along with a few other details:

We can make this cleaner using the “response” configuration option within the Tines webhook Action. You can enter text like:
Hi {{.user_name}}! Thanks for submitting your {{.command}} request to Tines, we're analyzing now(note, the JSON path is simply the underlying key, excluding the Action name).

Now, when you submit a command you’ll get a more contextual response:

We can now use Tines to perform an analysis of the domains submitted. Before we do, however, let’s get our Slack Credential so we can post a message back to Slack using the Tines Chatbot.
Creating a Slack Credential
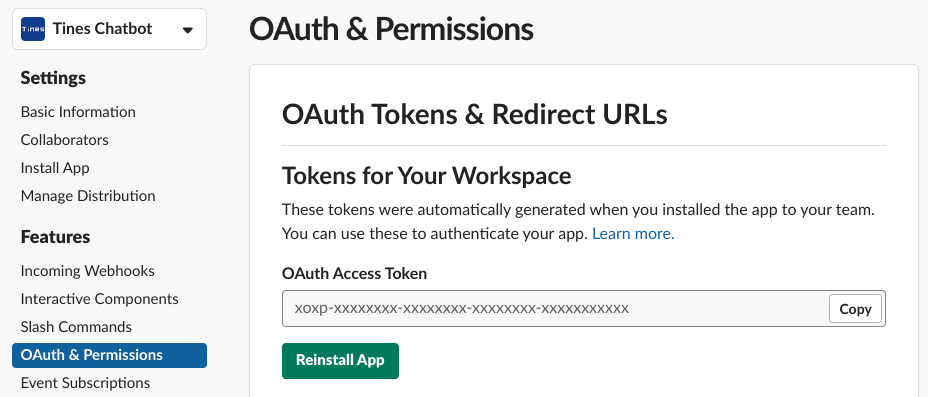
The easiest method to post a message to Slack is to use the OAuth token found in the OAuth & Permissions section. Copy this access token to create a credential called “slack_chatbot” in Tines.
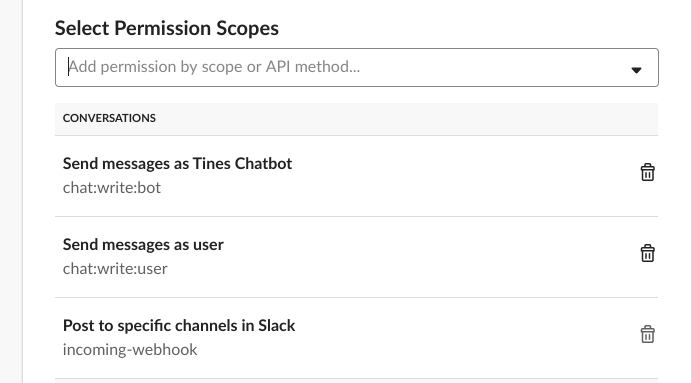
In the same section, you will also need to add in the scopes “chat:write:bot” and “chat:write:user”. You will likely need to install the application again.
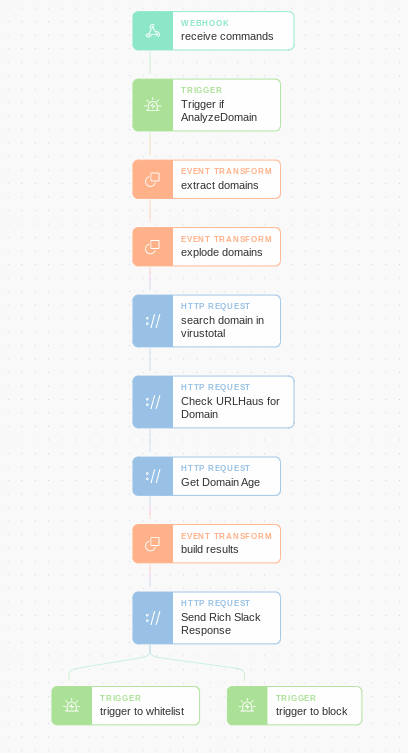
Now that we have our Slack configuration created we can build an Automation Story using the following Actions in Tines:
A Webhook Action, with the title “receive commands”, as created above
A Trigger Action – trigger on the the Slash Command for the value /analyzedomain
{
  "rules": [
    {
      "type": "regex",
      "value": "/analyzedomain",
      "path": "{{.receive_commands.command}}"
    }
  ]
}
3. An Event Transformation Action to extract out all the domains sent for analysis
{
  "mode": "extract",
  "matchers": [
    {
      "path": "{{.receive_commands.text}}",
      "regexp": "(?:[a-z0-9](?:[a-z0-9-]{0,61}[a-z0-9])?\\.)+[a-z0-9][a-z0-9-]{0,61}[a-z0-9]",
      "to": "domain"
    }
  ]
}
4. Another Event Transformation Action to explode all the domains found
{
  "mode": "explode",
  "path": "{{.extract_domains.domain}}",
  "to": "individual_domain"
}
5. Three HTTP Request Actions to search the domain in VirusTotal, URLHaus and Get the Domain Age in ipty.de. Note, you will need to have added a VirusTotal credential containing your VirusTotal API Key for this Action to run successfully.
 "url": "https://www.virustotal.com/vtapi/v2/domain/report",
  "method": "get",
  "payload": {
    "apikey": "{% credential virustotal %}",
    "domain": "{{.explode_domains.individual_domain}}"
  }
}
{
"url": "https://urlhaus-api.abuse.ch/v1/host/",
"content_type": "form",
"method": "post",
"payload": {
"host": "{{.explode_domains.individual_domain}}"
},
"headers": {
}
"fail_on_status": "true"
}{
"url": "https://ipty.de/domage/api.php?domain=",
"content_type": "json",
"method": "get",
"payload": {
"domain": "{{.explode_domains.individual_domain}}",
"mode": "full"
},
"headers": {
}
"fail_on_status": "true"
}6. An Event Transformation Action to transform these results into a cleaner format. We can use “If Widget” for this:
{
  "mode": "message_only",
  "forcepoint_category": "{{.search_domain_in_virustotal.body['Forcepoint ThreatSeeker category']}}",
  "urlhaus": "{% if check_urlhaus_for_domain.body.query_status contains \"no_results\" %}Clean{% elsif .check_urlhaus_for_domain.body.url_count != 0 %}Malicious{% else %}Unknown{% endif %}",
  "domain_age": "{{.get_domain_age.body.result.creation.fulldays}}"
}
7. Lastly, another HTTP Request Action to respond to the user
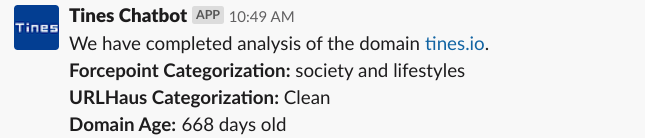
"text": "We have completed analysis of the domain {{.explode_domains.individual_domain}}.{% line_break %}*Forcepoint Categorization:* {{.build_results.forcepoint_category}}{% line_break %}*URLHaus Categorization:* {{.build_results.urlhaus}}{% line_break %}*Domain Age:* {{.build_results.domain_age}} days old"We can respond to the user using the channel_id received in the webhook event, and include the slack_chatbot credential we created earlier.
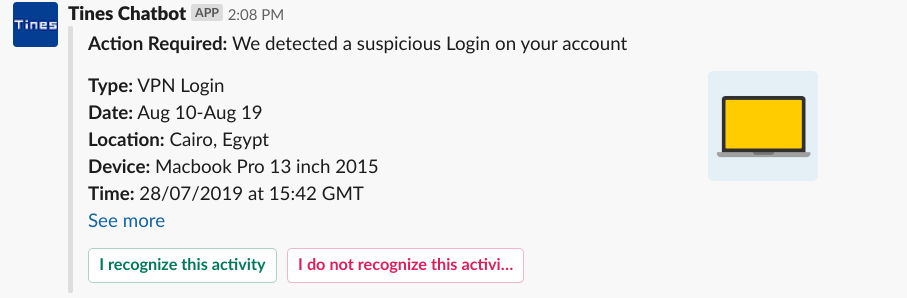
Rich Notifications
Earlier this year, Slack debuted the ability to build “Blocks”. They include templates of how you can create rich notifications like the below and a “Block Builder” where you can build out your own notification templates.
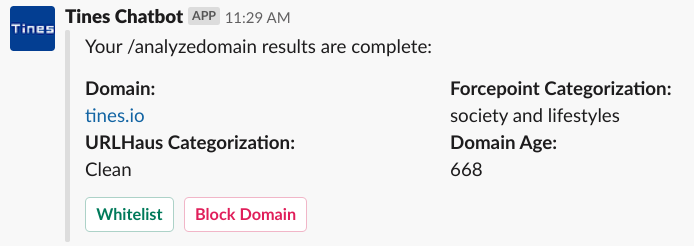
Using these rich notifications you can create cleaner notifications to send to your users using the Tines Chatbot. These can also include prompts for a user to take additional Action. The example included in our Story is above.
If you want you can take the “whitelist” and “block” prompts and create trigger Actions to take Actions based on these prompts. The completed Story looks like the below.
Proactive Slack Chatbot Notifications
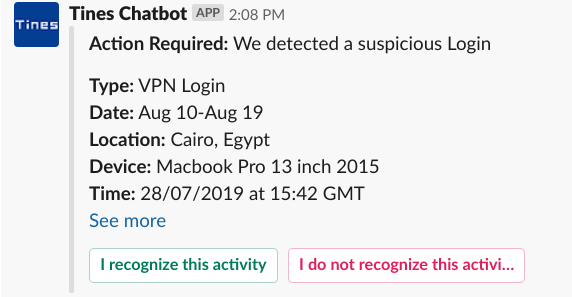
As we noted in Part 2, a Chatbot is useful not just for responding to user requests, but it’s useful for sending messages to users within Slack proactively. There are many reasons why you might want to proactively contact a user, for example:
Crowdsourcing suspicious activity with users e.g. logins from unusual IPs
Informing a security team of a high priority incident, or an IT team of a new ticket or request
Confirming validity of sudo commands
Validating change to user permissions
Confirming installation of unusual software
Processing approval permissions from managers and service owners for access requests
Prompting users to take Action before escalation of a ticket; to manage evidence etc.
Searching for a User Within Slack
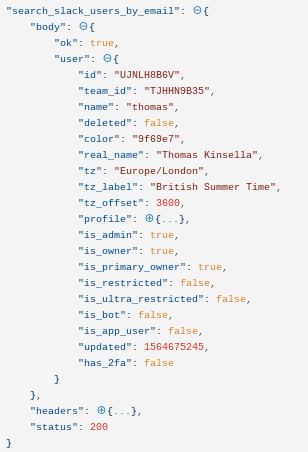
In order to send a message to a user proactively, it is necessary to find their Channel ID using their email address. You can search for a Slack user using their email address with the following Action template in Tines:
{
  "url": "https://slack.com/api/users.lookupByEmail?email=thomas@tines.io",
  "content_type": "json",
  "method": "get",
  "headers": {
    "Authorization": "Bearer {% credential slack_chatbot %}"
  }
}
Note, to do this you will need to add the users:read and users:read.email scopes to your application. You can do this in the OAuth & Permissions section of your application.
Once successful you’ll receive a result similar to the below in Tines:
You can now send a message to the user directly in their Private Channel using a message like this:
Congratulations! You’ve now created a Chatbot that can proactively alert users in dozens of Automation Stories.
You can download the complete Story here.
*Please note we recently updated our terminology. Our "agents" are now known as "Actions," but some visuals might not reflect this.*