
Continuing our series analyzing on automating the analysis of phishing messages, this blog will look at the importance, and methods, for analyzing email headers.
It is becoming harder and harder to determine the validity of suspicious emails. Malware distributors are using unique URLs for every recipient, compromising or creating hundreds of new domains every day, developing more sophisticated malware detection evasion techniques, and even now hijacking real conversations.
To be successful, analysts should be using all the tools at their disposal. One of these tools is analyzing email headers. Often overlooked, email headers contain important information about the route an email took before arriving in a recipient’s inbox and this information can help determine the legitimacy of a given email. Spammers frequently and easily spoof messages to make them look like they were sent from somewhere else. As such, it’s important to know how to analyze these headers correctly.
With many Tines customers running their own abuse inbox, it’s no surprise that one of the most frequent requests we hear from our customers is how they can automate the analysis of email headers.
Why Analyze Email Email Headers
According to RFC 2822 from IETF, all email messages must pass through certain characteristics to be processed by the receiving mailbox. Contained in these headers is a huge amount of information that can tell us more about the message and its authenticity. Headers can help us determine the sender’s IP, ISP, server, the tools they used to send the email, and the route the message took to arrive at its destination. Furthermore, they can even tell us the malware group that sent the message. When analyzing email headers there a few fields which are the most important to analyze.
What Email Headers should I analyze?
Originator Headers
Originator headers include common fields like ‘From’, ‘To’, ‘Subject’, ‘Originator-Date’ which are set by the sending mail server. Unfortunately, because the sending server sets these headers, a determined attacker can easily spoof them so they are not as valuable as other headers. They do, however, also include the message-id field which can be useful in determining the legitimacy of a message.
Message-ID
Perhaps the most overlooked field in message headers is the “Message-ID”. From Emotet/Geodo to Ursnif to Phorphiex/Trik (not to be confused with Trickbot!) the message-id field is often used by a botnet to track its operations and establish which ‘bot’ sent a particular message. It can also be used to detect whether your organization is being spoofed (e.g. if the message header shows it’s from @yourdomain.com, but doesn’t match your message ID pattern).
We can analyze the message-id field for certain patterns to help us identify whether the message was by a particular botnet. For example, the Emotet Group have previously used the Message-ID pattern:
For example, the Emotet Group have previously used the Message-ID pattern:
<20 numeric="" characters="">.<16 hex="" characters="">@<recipient domain=""></recipient></16></20>
Or, more literally:
11223344556677889900.0123456789ABCDEF@recipient-domain.com (see this article by Cofense for more information)
In Tines, we can write a regex to catch this message header, using a Trigger Action:

trigger agent for searching for email headers
More recently, Emotet have been using patterns like a 51 character hex string followed by @recipient-domain.com, or <11.22.334455.aa55cc99@recipient-domain.com> and . We can also include regexes for these patterns in the same event transformation Action.</11.22.334455.aa55cc99@recipient-domain.com>

trigger agent to search for emotet message id patterns
Note, these are sometimes prone to false positives – for the most up to date version you should check with your threat intel vendor, or you can contact Tines and we’ll be able to assist!
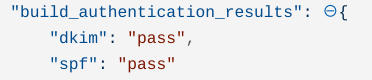
Authentication-Results
The Authentication-Results header is a trace header field where a receiver can record the results of email authentication checks that it carried out. Multiple results for multiple methods can be reported in the same field, separated by semicolons and wrapped as appropriate [0].
Frequently included in the Authentication-Results header is information on whether the sender passed DMARC, DKIM and SPF.
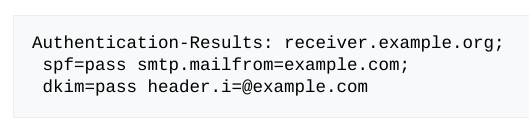
dmarc and dkim authentication results
The best way to search for these is through regexes for the pass or fail values. In Tines we can generate a message-only mode to give the results: dkim=neutral, pass or fail, which simply extracts out the results:
If the DMARC, DKIM or SPF results returned are “Fail” then it’s possible an attacker has spoofed the message.
Trace Fields
Trace Fields are a group of header fields which provide trace information and provide an audit trail of message handling. In addition, they also indicates a route back to the sender of the message. The main Trace Fields to analyze are the ‘Return-Path’ and ‘Received’ headers.
a. Return-Path
The final transport system that delivers the message to its recipient adds a ‘return-path’ header. This field is supposed to contain accurate data about route back to the message’s originating server.
b. Received
Every time a server or transport service relays a message it adds a new ‘Received’ header to the message. There are often three or more received headers associated with a single message. The first server that handled the message will have the ‘bottom’ received entry. Therefore, you should read the ‘Received’ Headers from the bottom up. This information is very useful to help us investigate phishing or spam. With this information we can find the server used to send the message and what relays delivered it. We can also use this information to determine if any open relays or relays known for sending spam sent the mail.
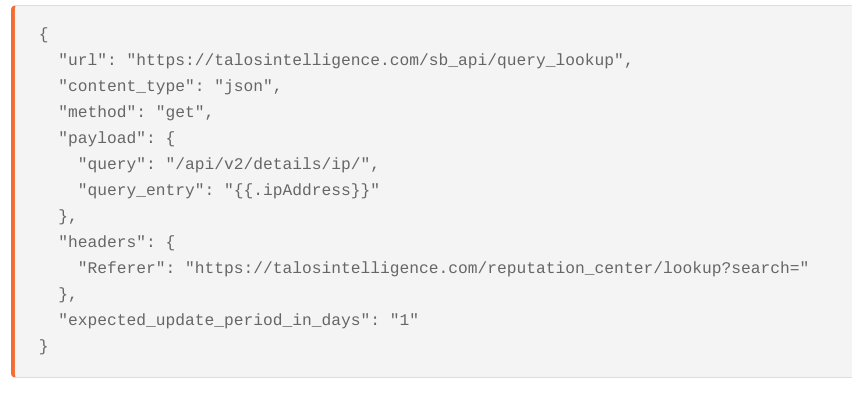
In the example below, we can tell that the message was sent from z17.autocontabil.com. The IP 139.99.75.19 then received the message and sent it to the recipient.
Analyzing the IP 139.99.75.19 in Talos Intelligence, for example, we can see this is a known Spam IP with a poor email reputation.
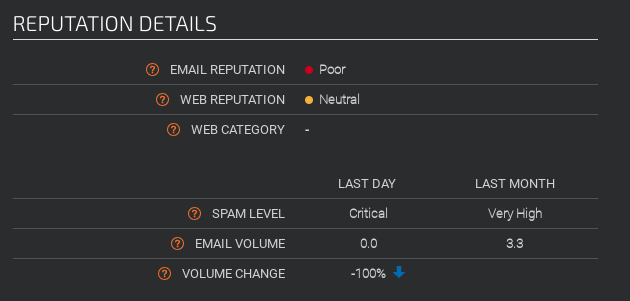
automate the analysis of email headers ips by searching in Talos Intelligence by Cisco
Using Tines and a Liquid Tag we can extract the last message header from headers Array in a Event Transformation Action:
We can also extract all the IP addresses from ‘Received’ headers using Tines.
Automate the analysis of email headers ips by searching in Talos Intelligence by Cisco
Using Tines we can also automate the process of checking the IPs against known blocklists like Cisco Talos Intelligence (or any other Threat Intelligence Provider) which will give us an ip address reputation score for sending email.
Lines Beginning with X
Receiving Email Servers also add their own email analysis of the message which is useful when analyzing. If received by your own email servers, these are the completely trustworthy entries.
The most valuable of these are often x-originating-ip and x-php-originating-script – these will extract out information we have extracted out previously. We can then automate checking them against a blocklist.
Received-SPF
The Received-SPF header is a useful way of determining whether a message has been spoofed. For example, a ‘permanent error’ in the ‘Received-SPF’ header most likely indicates that the mail has been spoofed by an attacker and the sender policy framework has failed. Note, however, this not always included in Message Header, but it can be a
You can read more about how to manually extract email headers here https://mxtoolbox.com/Public/Content/EmailHeaders/
How to Extract Email Headers
Knowing what to analyze is often just half the problem in the analysis of email headers. The other half of the problem is extracting the message headers themselves. Fortunately, using the Tines Security Automation and Orchestration platform, it’s possible to retrieve Message Headers from any email platform. In the below two examples we’ll analyze headers in emails in Microsoft Office 365 and in GMail.
Using Microsoft Office 365
Microsoft’s default configuration for viewing emails in Office 365 using the Graph API does not automatically returning message headers, however to retrieve the message headers of a message in Office 365 is pretty simple, as Microsoft expose the endpoint:
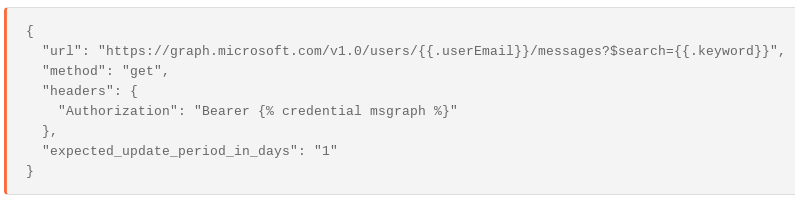
If we do not know what the emailId is we can search for messages using different keywords or terms in the user’s mailbox. (Be careful not to confuse the emailId with the ‘message-id’ header!)
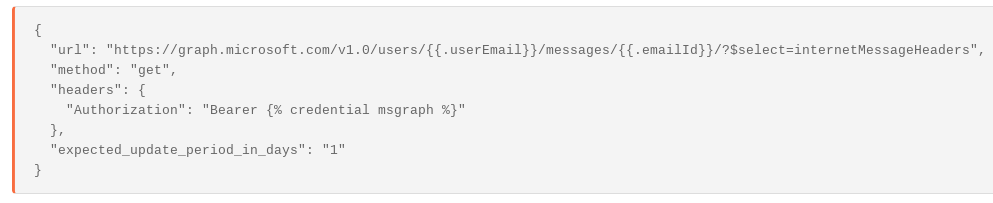
Extract Headers from Microsoft Attachment
Because this practice is prone to error and false positives, a lot of companies already automate process of sending suspicious messages as attachments to their abuse inbox. In this case, we can also use the graph api to analyze the message headers of the attachment.
(Note, in order for this to work, Microsoft must recognize the attachment as an #microsoft.graph.itemAttachment )

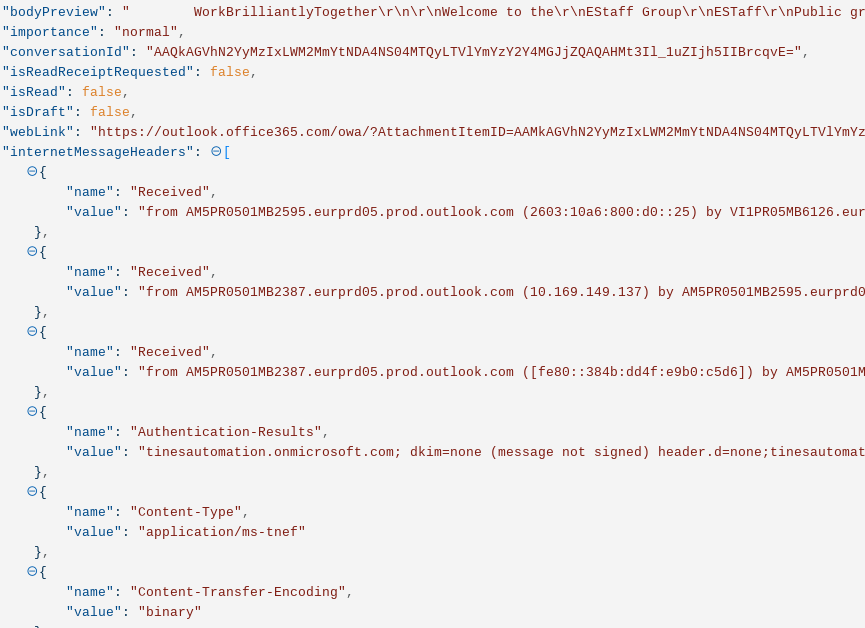
This request returns email headers in the format of an array in the field ‘internetMessageHeaders’
The end result is a Story which looks like this:

You can download this Story for your own Tines tenant here.
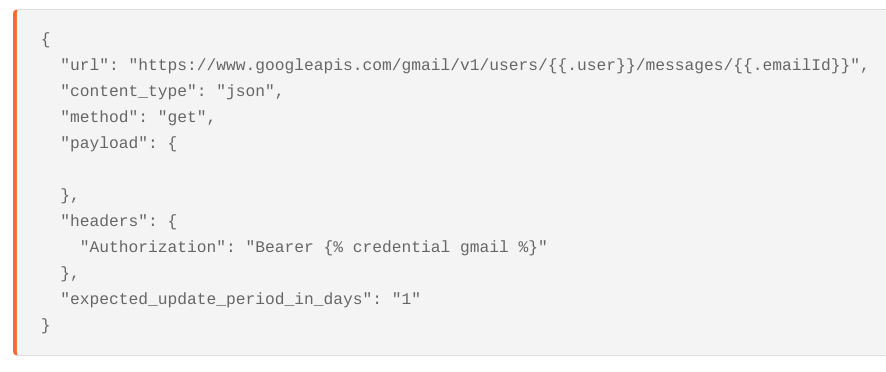
Using Gmail
Gmail makes the analysis of email headers easy as it automatically returns message headers within the message itself. In contrast to Microsoft, headers are always returned in Gmail with a simple ‘read email’ request using the email’s ‘emailId’. (Again, do not confuse this with the Message-ID header!). As an example see the Action ‘retrieve email from gmail’ below:
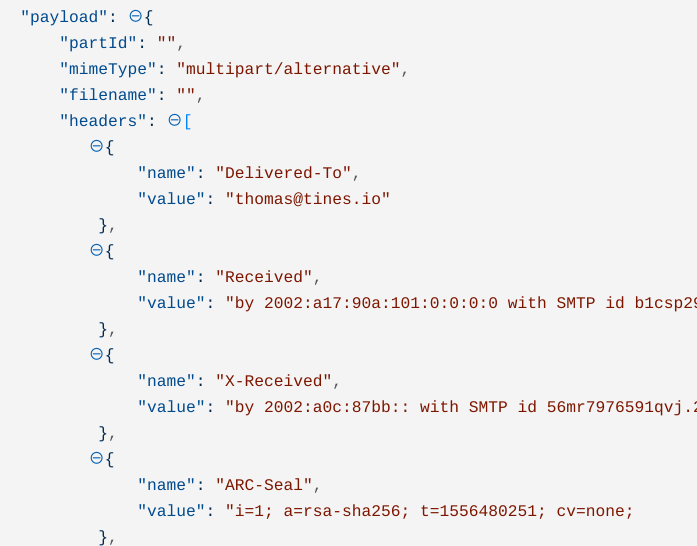
You can find the extracted headers in the ‘payload.headers’ path of the json returned.
Consequently, every field in the array can easily be referenced in future Actions using a ‘where’ liquid loop:
Extract Headers from Gmail Attachment
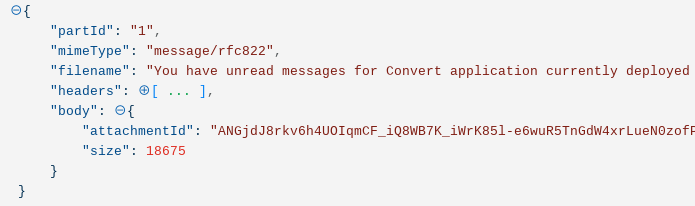
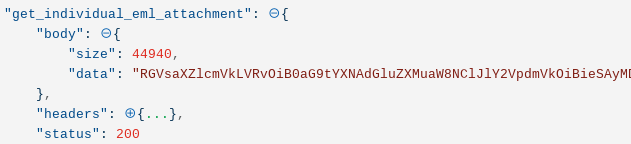
Gmail also make the process of analyzing mails sent as attachments to an abuse inbox very easy. The first step is to get the contents of the attachment, by attachment Id.
First, we find the attachment details in the original message:
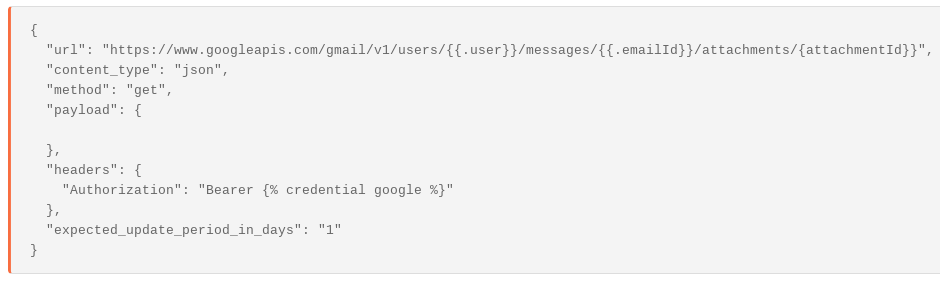
Then, taking the attachment Id we can create a query in Tines to return the raw eml file:
This query will return data in the form of a base64url encoded version of a .eml file:
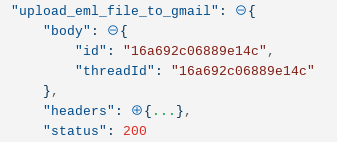
We can take this ‘data’ returned and import it directly into Gmail, which will create an email that can be recursively analyzed in Gmail. The upload will return an ‘id’ and ‘threadId’.
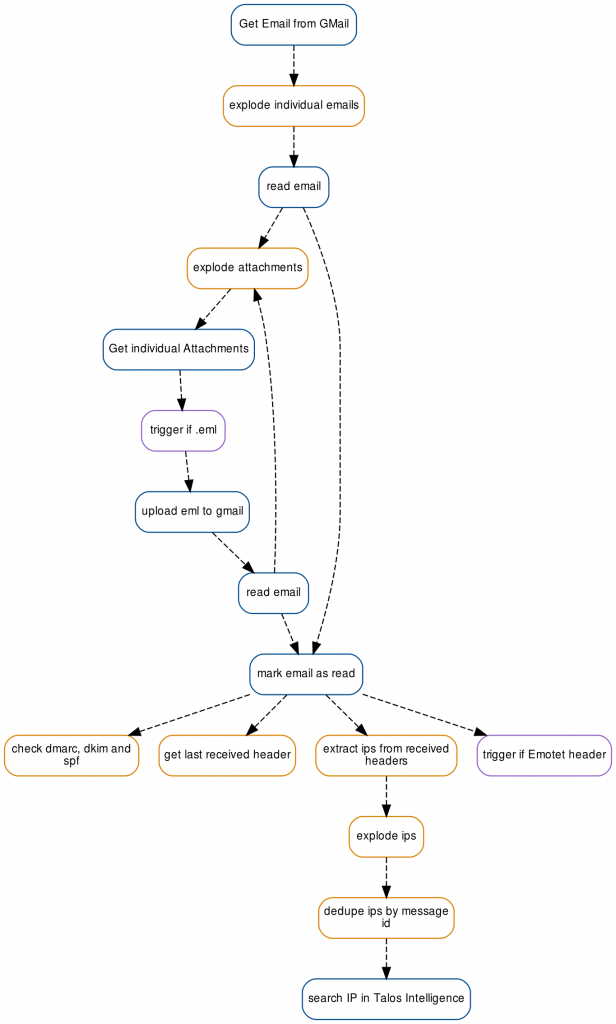
We can read the new email using the same configuration from the ‘retrieve email from Gmail’ Action above. Any attached email files will also be pulled out recursively. The end result is a flow which looks like this:
automate the analysis of email headers in GMail
You can download this Story for your own Tines tenant here.
*Please note we recently updated our terminology. Our "agents" are now known as "Actions," but some visuals might not reflect this.*
Next Steps
You can directly download the Microsoft Story or Gmail Story directly for your own Tines tenant.
[0] https://en.wikipedia.org/wiki/Email_authentication
Useful Resources:
https://mlhale.github.io/nebraska-gencyber-modules/phishing/email-headeranalysis/
https://www.alyninc.com/2018/11/10/email-headers-what-can-they-tell-the-forensic-investigator/
https://cofense.com/category/threat-intelligence/page/4/
https://cofense.com/dark-realm-shifting-ways-geodo-malware/